Friday, October 31, 2008

HSC 41 - Sketch For You AND Something NEW!

Happy Halloween!!!

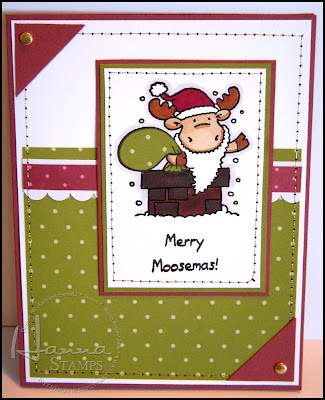
It is my turn again for the Hanna Stamps weekly challenge -- as usual, I decided to do a sketch, this time inkspired by a gorgeous card made by LorriHeiling, but I also added the additional challenge of using paper piecing (like Lorri did) on your main image. In fact, she took it a step further and did the painting with paper technique, where you basically paper piece the whole image. Feel like a real challenge, go try that! The sketch is a very simple layout, so it leaves a lot of possibility open to you! Hope you have a chance to play with my sketch and upload on SCS this week (remember to use the keyword: HSC41)!


For this card I used my most recent JoAnn's discovery -- silver and gold thread (in this case gold) to stitch around the edges of the image panel and the exterior panel. It just adds a little subtle sparkle. (see close up picture) I love the stuff. They also had copper. It is priced a little higher than the normal SULKY threads, but I bought it when they were 50% off, so it was really only a couple dollars and will last a long time. WONDERFUL!!!! Image was colored using my copic markers and I paper pieced his bag full of goodies. Scallop was made with white paper frills. Such a simple Christmas card, but super festive!!

Stamps: Santa Claus Riley (Hanna Stamps), Things Riley Would Say (Hanna Stamps) Paper: Neenah Solar Crest White, Old Olive Designer Series Papers - Dots (SU!), KI Memories - Joyful Pin Dot {Holiday Collection}, Cranberry Crisp (SU! - retired), Old Olive (SU!) Ink: Onyx Black Versafine Accessories: Gold Sulky Thread, Sewing Machine, Doodlebug Designs - White Paper Frills, copic markers, gold brads, clear embossing powder

Be back later tonight after some Halloween fun with pictures of my kids in their costumes. Hope you have a happy and safe Halloween Evening!!!

Thursday, October 30, 2008

Ballet and Pumpkin Face Masks

Today was the day they allow parents to watch through the window at ballet class. I stayed the whole time so I could see what she is being taught. It was fun and good to see the teacher was correcting them from time to time and was super encouraging and awesome with them. YAY! Of course I took a couple pictures to share -- these were from at the beginning when they were doing barre work. In the first one, she is struggling to get her feet into 5th position . . . it wasn't just her -- ballet is confusing stuff. The other two, I love her posture! She loves ballet!!!


I have been saying I wanted to do this for days, but tonight we actually did it. Susan Ciminelli was on Martha Stewart about a week ago talking about fall skin care (and my skin is insane with all the hormones right now.) Her suggestion was a pumpkin masque using pumpkin puree and whole milk yogurt (which I happened to have on hand) so E and I did a masque last night. She thought it was pretty funny! Afterward my skin felt surprisingly soft and clean! YAY!!!

I have found that since I found out I am having another boy, I have been finding ways to cherish girly moments more often with E. It has been super good for us. I know that sounds cheesy, but it is true. I love my little girl!!! We look like we have cheez whiz on our faces or something in these pictures *giggles*


Wednesday, October 29, 2008

For Jaime - Simple Halloween Cupcake Box

Halloween is getting SO close! YAY! Are you ready yet? I have mostly laid out costume stuff . . . but I know I will forget something!!! I have people from the warranty company at my home today and tomorrow fixing stuff (like cracks on the exterior of the house, etc) so I am stuck here till at least noon today, so I thought I would take some time to update the blog.

So, a long time ago when my friend Jaime lived lots closer to me, I made cupcake boxes (similar to the ones to hold 4 cupcakes by Wilton in size) and said I would post how I did it to show Jaime -- well *embarrassing flash forward to now* I still have not posted the simple directions. *sigh* That is SO how it goes. I am so forgetful, but hey, here I have remembered, hope these will work for you to take goodies to a neighbor or friend this Halloween, Thanksgiving or Christmas.

I think I am going to take one of these with some chocolate spiders to one of my friends who looked after my kids for me the other day while I went to the Dr. (see recipe below - NOTE: someone in one of the reviews said they called it reindeer poop when plain)

This box takes two 12x12 pieces of paper -- I usually use one plain (Prism Classic Orange) and one patterned paper (Sandylion Sticker Designs - Halloween Circles) - double sided papers could be fun here. You can use a cereal box to create a square for the bottom to add support. You can also line it with parchment paper or wax paper to protect it from greasy marks. You could also use nestabilities to cut a cupcake holding template to go inside . . .

Directions:

STEP 1: With a 12x12 sheet of patterned paper, score around the edges at 2.75 inches. Cut tabs on each corner up to this line (4 cuts total). Fold on all score lines (just to get a crease)

STEP 2: Cut out box center at 3.5 inches in from each edge. Cut a piece of acetate, 6.5 x 6.5 inches. Using sticky strip, adhere to box center cut out you just made. Fold tabs in to form box lid.

Cut 1/8 inch off top and second piece of paper. Repeat Step 1 with second sheet of plain 12x12 paper for the bottom and then fold tabs in to form box bottom. Place a piece of chipboard, or cereal box (measuring 6.5 x6.5 inches- or a little less to fit) in the bottom for support. Fill with cupcakes or treats, place lid on top, and deliver to a friend! Easy peasy! And no doubt clear as mud. Ribbon is by American Crafts.

Chocolate Spiders
(From allrecipes.com)

INGREDIENTS

* 1 half bag of semi sweet chocolate chips
* 1 half bag of butterscotch chocolate chips
* 1 (8.5 ounce) package chow mein noodles

DIRECTIONS

1. Place chocolate chips into a heatproof bowl over simmering water. Cook, stirring occasionally until melted and smooth. (Microwave could be used for this step). Remove from heat and stir in the chow mein noodles so they are evenly distributed. Spoon out to desired size onto waxed paper. Let cool completely before storing or serving. I used white chocolate chips flipped flat side up with a little dot of black decorating gel for the eyes!

Tuesday, October 28, 2008

Saw This and HAD to Try It

I was blurfing and came across Monika's blog, where she made this marvelous mini card with a sewing machine stitched spider web -- well, we all know how I love stitching on cards, so of course, I had to try it. It turned out to be surprisingly harder than I thought it would be, but the results are just awesome! I ended up using a white colored pencil to gently make a thin line to guide me on the curvy line parts. This worked SUPER well. Of course, I figured that out on my third time. Also, Monika said she hand turned the sewing machine wheel to have greater control and I would also recommend this!!!

I made this into a recipe card tag and made some Pumpkin Spiced Gingersnap Truffles (recipe from Oct. Better Homes & Gardens) to go along with it to give away. We went to a Halloween party last night and I thought they would make the perfect hostess gift in a cute little bag Hope she liked them.

Pumpkin Spiced Gingersnap Truffles

1 1/4 c. semi sweet chocolate pieces
1/4 tsp pumpkin pie spice
1/4 tsp vanilla
1/2 c. whipping cream
3/4 c. chopped gingersnaps (about 10 cookies)
1/3 c. crushed gingersnaps (about 7 cookies) and/or
1/4 c. unsweetened cocoa powder

1. In a medium bowl combine chocolate pieces, pumpkin pie spice and vanilla.

2. In a medium microwave safe bowl place whipping cream. Microwave on 100% power for 70 seconds or until boiling. Pour cream over chocolate mixture. Let stand 5 minutes. Whisk until smooth. Stir in chopped gingersnaps. Cover, refrigerate 1.5-2 hours until firm but soft enough to form into balls.

3. Place crushed gingersnaps and/or cocoa powder in small bowl. Using a small spoon, scoop 1 tablespoon portions of truffle mixture and shape into balls. Roll in crushed gingersnaps or cocoa powder to coat. Refrigerate 1 hour or until firm. Store, covered, in refrigerator up to three days.

*****

Here are some pictures from lunch yesterday where we tried out the Yummy Mummy Dogs recipe that I posted recently! They turned out fun and the kids liked them (still refused to eat them but thought they were cool, eventually they ate them, but they were slow in getting started with it). I think J might have been a little nervous about them -- big imagination probably made him think they were eating real mummies or something.


Monday, October 27, 2008

Eyeballs Haunted Treat Boxes & Family Antics

Happy Monday! Can you believe Halloween is this week already? I am SO excited! Since we live in a half developed neighborhood and a cul de sac, I think we are going to go to our church activity on Halloween night. Should be fun! Seriously, time around the holidays just seems to fly by. It is cool because I have never been pregnant this time of year and the weeks are just zooming by and soon I will have my new little guy here to cuddle.

Make sure you take lots of pictures of your costumes this year, because I always do and I think this year I am going to do a costume roundup post, where you can submit your costume pictures for us all to enjoy! I think that sounds fun!

I saw these fun boxes on Splitcoast and had to make my own. In the original, Jeni used swirls on the acetate, but I thought my Papertrey Ink spiders would be perfect to have crawling all over the eyeballs. I also used some smaller sized eyeball chocolate that I found at my dollar store. Such an easy project, a basic 2,4,6,8 box, altered to make it look extra creepy! I just adhered the circle on the front. Easy peasy. The fun spidery paper is from Making Memories. LOVE IT!!!

Stamps: Spooky Sweets (Papertrey Ink) Paper: Spellbound by Making Memories - 12x12 Polka Dot Stripe, Pumpkin Pie(SU!), Whisper White (SU!) Ink: Staz On Black (Tsukineko) Accessories: Nestabilities Circles, Black Sheer Organdy ribbon with white dots, acetate, red sticky tape (for extra hold).

Yesterday I decided to take some pictures of my kids! It was my mommy's birthday (Happy, Happy Birthday mommy dear), and I know she loves pictures of her grand babies. I took some pictures of E's hair -- I found a cool design on "Girly Do's By Jenn" and had to try it! The hairstyle was Head Band: With Climbers and was surprisingly not that hard! It turned out cute and kept her hair out of her face for the day! Love that! We curled the remaining hair in back with my hot curlers to complete the princess look.

It has also been awhile since I have done funny face pictures with my kids(always one of my favorites) so we took some of those too! ENJOY!


One last quickie piece of fun news . . . you know that awesome site Grosgrain Fabulous, that gives away the most adorable children's clothing all the time, well, she is opening a mini store! I am so excited!!! YAY! You have to go check it out as of Nov. 6th AND don't forget to stop by and check out her amazing Marie Therese costume she made *faints* It is stunning!!!

Thursday, October 23, 2008

Scary Black Roses Vase

I have been feeling so inkspired by all the crafty things I see around me.

This idea is CASED from Crafts & Things p 25 (October 2008) and I think it will make the perfect centerpiece for a Halloween Party. I changed a couple things to make it easier to make AND you will not believe the smokin' hot deal I got on these roses -- they were $1.19 each, and then I bought them when Michaels was having their buy one, get one for 1 cent sale, so I got a dozen for $6 (the girl at the checkout had issues and missed some - only rang up 10). I used regular black glitter (that was for sure the messiest part of this arrangement), and adhered it to the flowers using watered down modge podge. I think I would have used a more fine glitter if I were to repeat this project. I used Kelly's Non-toxic glass stain (609 - Orange), which I found in the stained glass section of Michaels. I used a sponge brush to dab it all over a clear vase ($1.99 at Michaels), and then I let it dry overnight. I liked the textured look this gave the case. Then I used black electrical tape to tape stripes over the hardened glass color. Finally, I tied on the spider with ribbon and placed the glittered flowers in the vase!! The vase pictured in the magazine, used lights inside to make it glow -- I was thinking maybe one of those pumpkin battery operated votives will work perfectly for this! I love Halloween.

And since we are talking about things to put on your table . . . I thought I would share some links I have found while surfing to some fun recipes that I either want to try or have tried recently:


Monday, October 20, 2008

Weekend Fun at Disneyland

Okay, so seriously, sometimes I make dumb decisions, and going to Disneyland at 8 months pregnant is totally one of them, I could barely walk after the two days, but I really, REALLY wanted to go while they have the Haunted Mansion all decked out for Halloween with Nightmare Before Christmas stuff, and I am SO glad I did, despite the huge and gross cankles I now have. It is not to be missed. It was WAY less scary than the haunted mansion normally is AND it is just fun and happy! I seriously was like a little kid inside -- all giddy and excited. YAY! Be sure to use fast passes if you go though as the standby line up was a little long. With the fast passes though, it goes super speedy and you are in, in no time! I *may* take too many pictures. ENJOY!


Before we left for this trip, I asked the kids what they wanted to do while we were there. E said she wanted to go see the princesses. J said he wanted to go on Star Tours. I said I wanted to go on Buzz Lightyear Astro Blasters (I love this ride), and M did not really say, but I know a trip to Disneyland would not be complete without going on Pirates of the Carribbean. We managed to get to everyones favorites on this trip, even though it was really short.

We also got to go out to eat at Bubba Gump Shrimp Co. I had wanted to go try it there and it was fun! I loved that they had Forrest Gump playing on a big TV, I loved their "Run Forrest Run" and "Stop" signs which would bring your waitress over to help you. It was just really relaxed and fun. Everyone got a picture in Forrest's big shoes on the bench (even though J was less than enthused.)


We got to enjoy some of Woody's Halloween Roundup (in Big Thunder Ranch which is usually empty). They had coloring, and crafts, a show, lots of places to take pictures, and cookie decorating (which we did not do since they were trying to charge $6 a cookie -- sheesh). It was a fun time though. It was nice to see something going on in that space and it not just being wasted.


Here are some other fun "Halloween Time" pictures from Disneyland -- the kids loved posing by the skeletons and choosing their favorite pumpkin from around the main center island at Disneyland in front of the castle.


The last thing we did was E wanted to go meet the princesses and J wanted to go on Autopia, so M and I divided and conquered them both before we left. I got E's face painted and she was so excited about it. She loved feeling like a princess. She is just too cute!! My camera died right before we went over to California Adventure and the candy corn harvest, so I missed those pictures, but all in all we had a wonderful two days at the parks and since it was our last time before the new little guy arrives, I know these will be memories we cherish!