Wednesday, November 29, 2006

What's For Dinner Wednesday - Barbecue Chicken Casserole

This sounded yummy, I have not tried it yet, it is a new to me and you one . . . let me know how it goes! Hugs, Amanda

Tonight for Dinner: Barbecue Chicken Casserole
Ingredients
  • 1 cup all-purpose flour
  • 1 broiler/fryer chicken (3 to 4 pounds), cut up
  • 2 tablespoons vegetable oil
  • 1 cup chopped onion
  • 1 cup chopped green pepper
  • 1 cup thinly sliced celery
  • 1 cup ketchup
  • 1/2 cup water
  • 3 tablespoons brown sugar
  • 3 tablespoons Worcestershire sauce
  • 1/2 teaspoon salt
  • 1/4 teaspoon pepper
  • 1 (16 ounce) package frozen corn, thawed

Directions
  1. Place flour in a large resealable plastic bag. Add chicken, a few pieces at a time, and shake to coat. In a large skillet, brown the chicken in oil; transfer to an ungreased 13-in. x 9-in. x 2-in. baking dish.
  2. Drain skillet, reserving 2 tablespoons drippings. In the drippings, saute onion, green pepper and celery until tender. In a bowl, combine the ketchup, water, brown sugar, Worcestershire sauce, salt and pepper; add to vegetables. Bring to a boil. Pour over the chicken.
  3. Cover and bake at 350 degrees F for 30 minutes. Sprinkle with corn. Bake 18-20 minutes longer or until chicken juices run clear and corn is tender.

Tuesday, November 28, 2006

A funny

I was browsing another site and came across this. Hope you all like it. Happy Tuesday!

The Secret World of Scrapbooking

I have some pages I did in the last couple of days that I need to upload, but no time to do that . . . so, maybe tomorrow . . .

I read this thought today and I really like it:

We are not the same persons this year as last; nor are those we love. It is a happy chance if we, changing, continue to love a changed person. -William Somerset Maugham, writer (1874-1965)

Monday, November 27, 2006

Jody's Swaps - November

So I was a little late on sending this month (so what's new?) Seriously, that is why I cannot be on a design team for anywhere, I have issues with deadlines. I don't mind being early or late, but rarely on time.

The first thing I made for Miss Jody, was some CD's of awesome Christmas music I have collected. I dressed them up all pretty and I think they turned out cute. I used that Michael's snowflake stamp -- which has proven to be a favorite, in spite of its $1 cost. Seriously, I hear about people stocking up on $1 stamps and never using them, but I have to say, that is not me. I love them all -- all stamps deserve a little love!!!

This second project is three panels of a coaster frame. Yes, I just had to get in on that coaster deal on SCS. I mean, how cool are blank coasters. As usual I did not go over the top though, and I just got 50. I like them. I did add hinges in between so this little frame can stand on its own. The photo corners are in place and ready for Jody to add adorable Christmas pictures of her three adorable kiddies.

Talk about a pain in the patootie. This ornament gave me so much trouble. I had done glass etching before, but for some odd reason, it was not etching very smoothly this time. SO, I ended up etching the whole surface to get a more uniform look, and then embossing snowflakes in silver on the front and back. Then I added a white ribbon and silver ribbon on the top and it was done. I really hope Jody likes this one. It is sent with much love. It seriously was stressing me out bad. I had to walk away from it numerous times to keep from throwing it across the room. The ornament blanks came from Michael's and were fairly inexpensive. I plan to make more, I just hope that the etching cream works better. I will have to go on a search on SCS and see if there are any new tips for me on how to make it look more uniform. I hate being a perfectionist.

This container was just a spice jar that I managed to get on sale at Michael's one day. I thought it would look cute etched. I used the etching cream on this and it did etch smoother, not sure why. First I embossed the image from SU "Happiest of Holidays" and then put the cream on and let it sit, and then rinsed and scrubbed off the embossing powder with my fingernails (no small task considering - brace yourself, this is yucky la la - I bite my nails.) After the etching was done, I dressed it up a little with some paper and ribbon and added the M&M's. A yummy little christmas treat.

This grand finale was inkspired by all the cool clear cards I saw in the Christmas issue of papercrafts. I just had to try one for myself. I think it turned out cute, but I still am not sure if I like transparency cards because I am not sure where to write a message on them other than the sentiment.

I used SU designer series paper. I embossed the snowflakes (that stamp from Michael's again) in silver embossing powder. At first I was a little afraid of doing this -- scared the transparency would melt, but I had the right kind. I also worked fast to make sure it would be okay. I added silver ribbon across the top to perk it up!

I really hope Jody likes all the stuff I sent her. I also sent a little "spread love not cooties" hand wipe funny, and some emergen-C. Jody has been a little sick (understatement of the century) so I am hoping that will help her feel better.

Friday, November 24, 2006

Draw from my 100 first subscribers . . .

Drum roll please . . . .

And the winners are . . .

artfullyinking at comcast.net


and

memorygarden at cox.net

If both of you would email me your private information, I will send you your prize. I decided that this will include, a christmas ball, some gift tags, some candy and some sort of embellishment, still TBD (aka, I did not make it to Hobby Lobby yet today). Thank you all for your support by subscribing to my blog.

If you are interested in how the winners were chosen: I took the list of the first 100 subscribers and messaged my DH and told him to tell me 2 numbers between 1 and 100. Then I counted subscribers, not including the anonymous ones, until I got to the numbers he gave me, which were 17 and 74! Thanks for playing!

It's HERE!!!!!!! Tutorial for Pinecone Balls

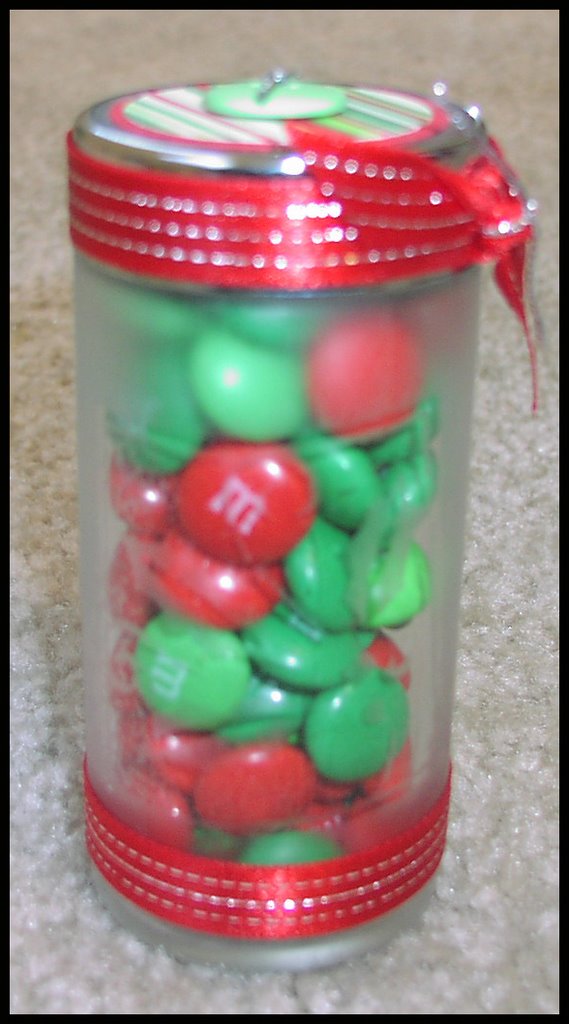
UPDATED: For all of you interested in winning a kit to make these balls -- go HERE by December 1st, 2007 to enter to win!!!!!

HAPPY BLACK FRIDAY -- So you missed the greatest deal ever because you were too far back in line -- never fear, I am here to help your day get better!!!

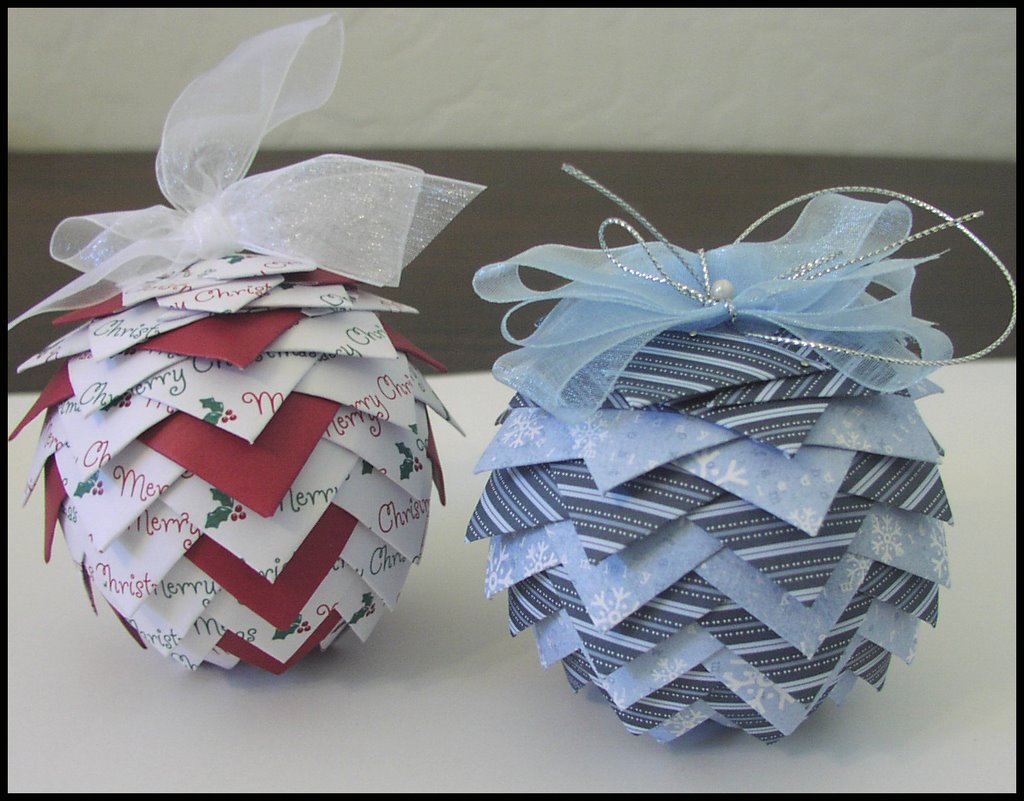
Okay, due to the overwhelming demand for directions, I decided to do this a little earlier than I planned because SERIOUSLY you guys are all overloading my email box. I really hope you "get" them and that at the end of this tutorial you all will be happily playing with your pretty christmas ball. Bear with me, this will be my first time ever doing this . . .

INGREDIENTS:

1 sheet of 12x12 paper (or a couple if you like)
1 three inch foam ball (white foam kind)
1 package of pins (I use Applique pins - 19mm - you can get these at walmart)
1 length of ribbon (I prefer wide SU organdy)
1 thimble
1 paper cutter

STEP 1
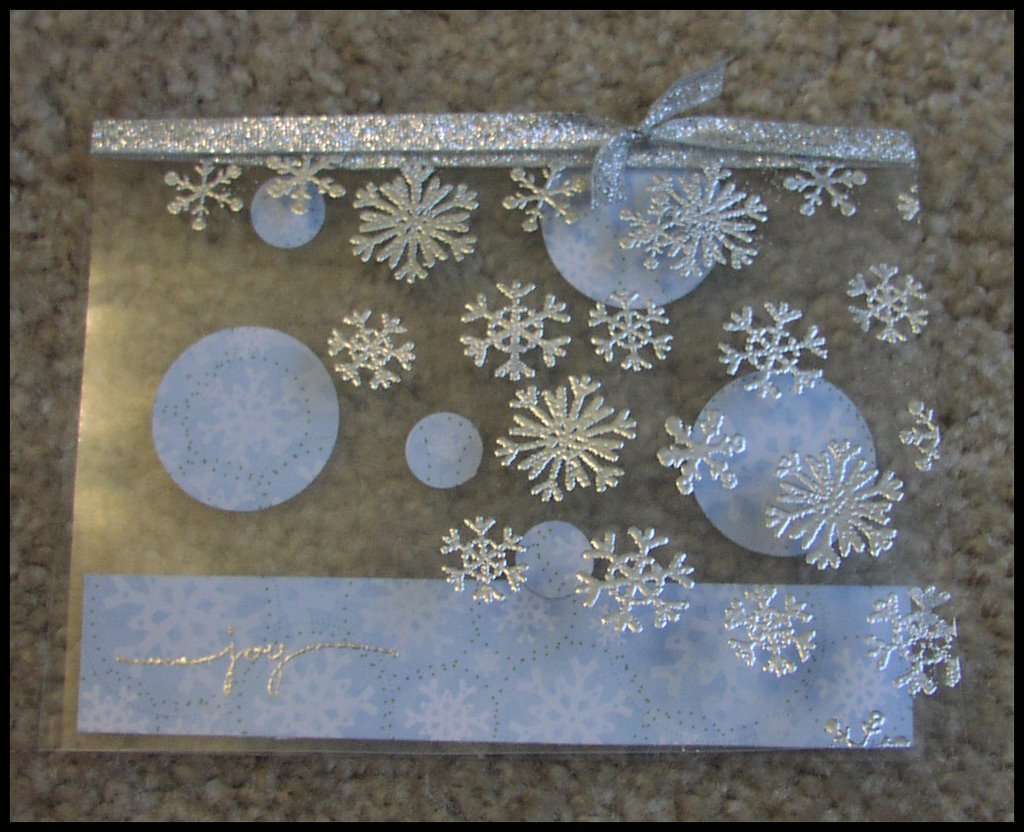
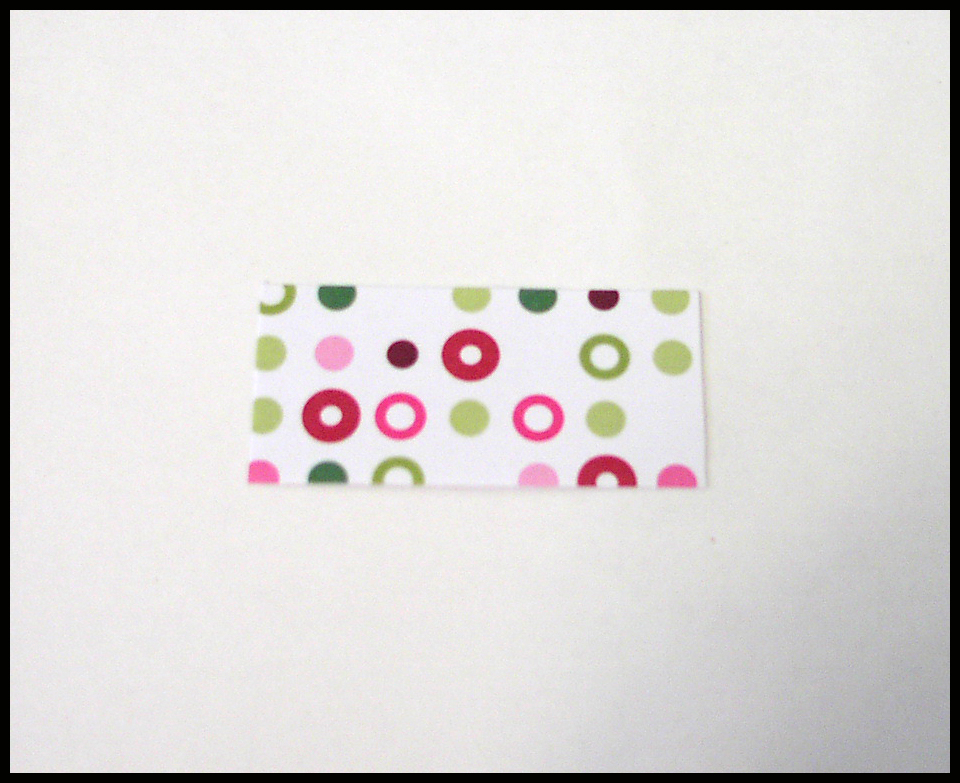
Choose your paper(Mine is by K&I Memories). Small prints or loud paper work best when choosing which paper to use. As I learned with this one, white is not always the best color to have in the background. Once you have decided, cut the paper into 1 inch x 2 inch pieces (rectangles), the entire sheet.


STEP 2
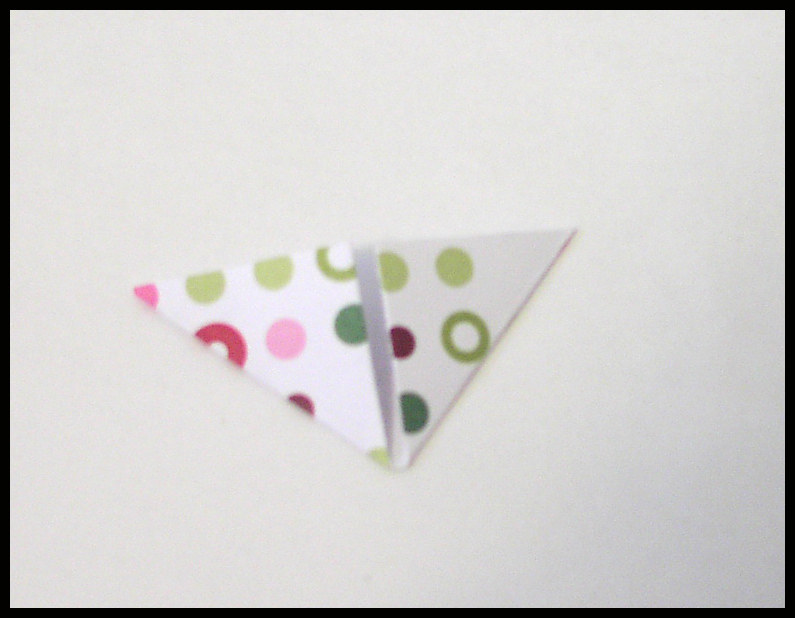
Fold your papers to make a point (see picture). Both corners meet in the middle.
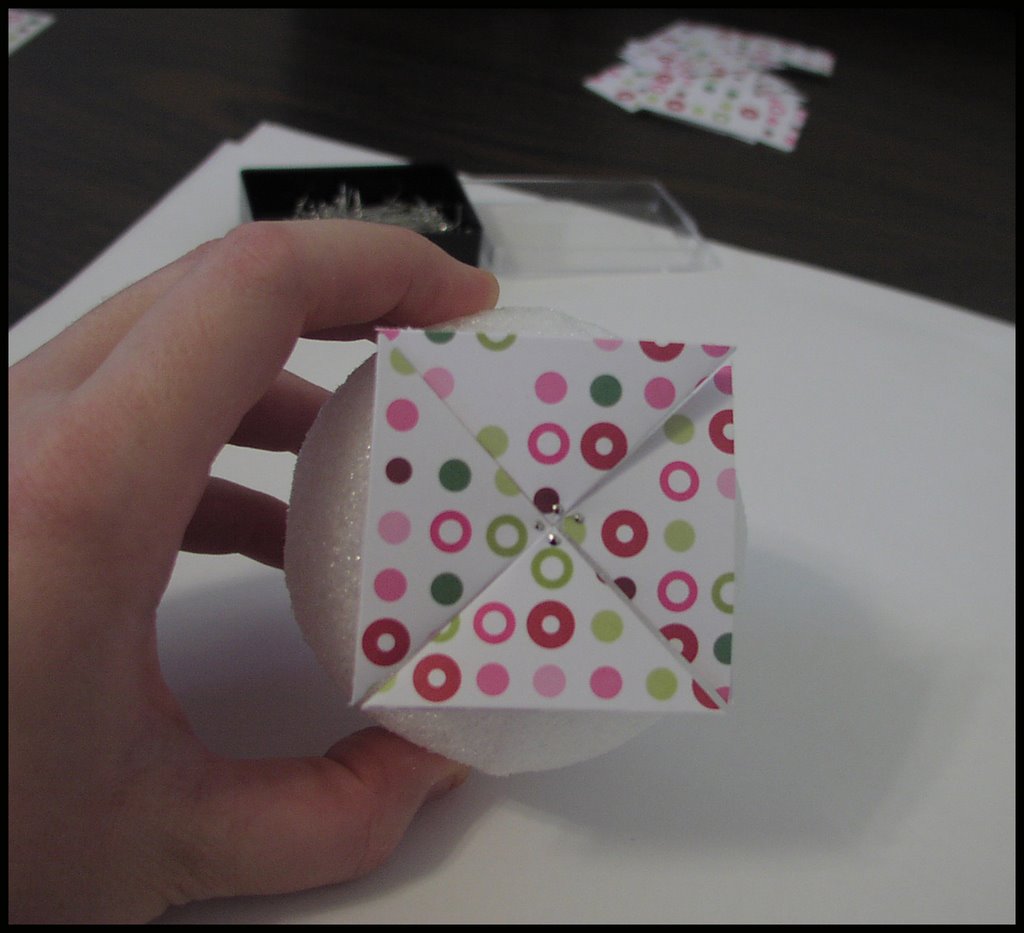
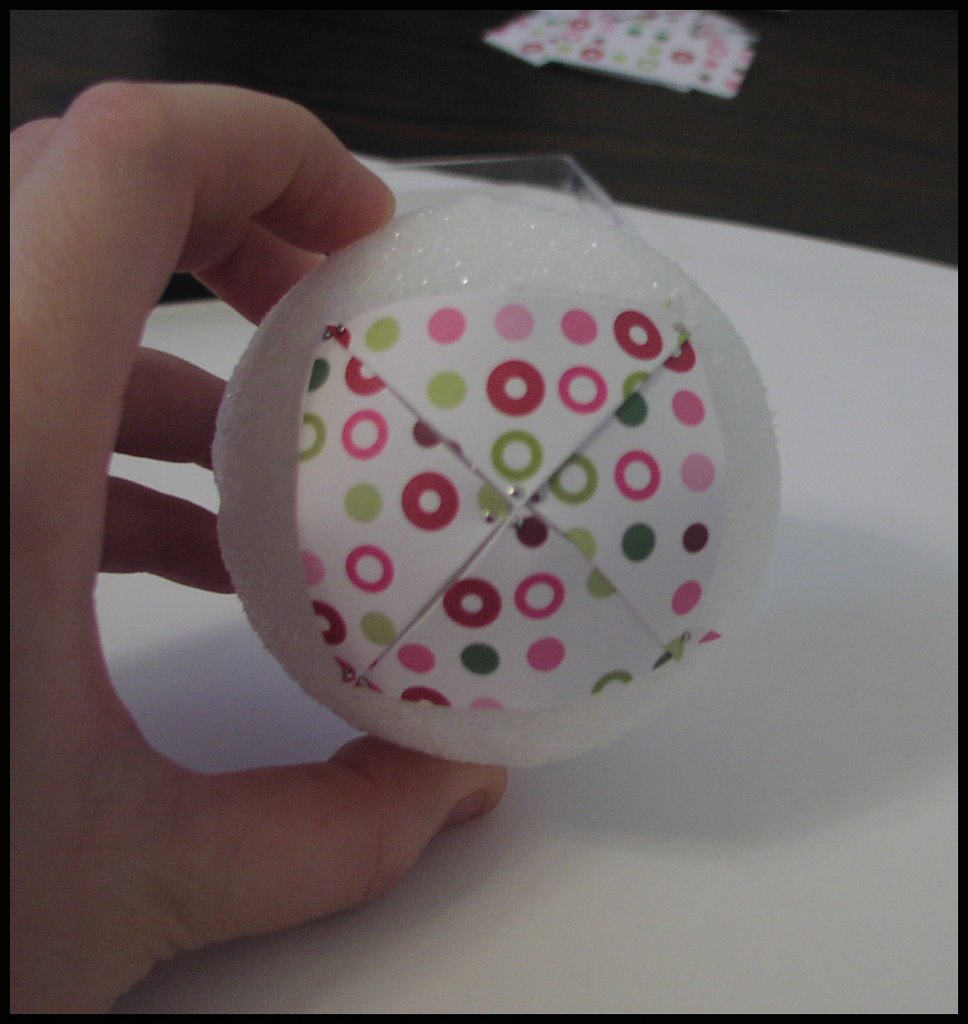
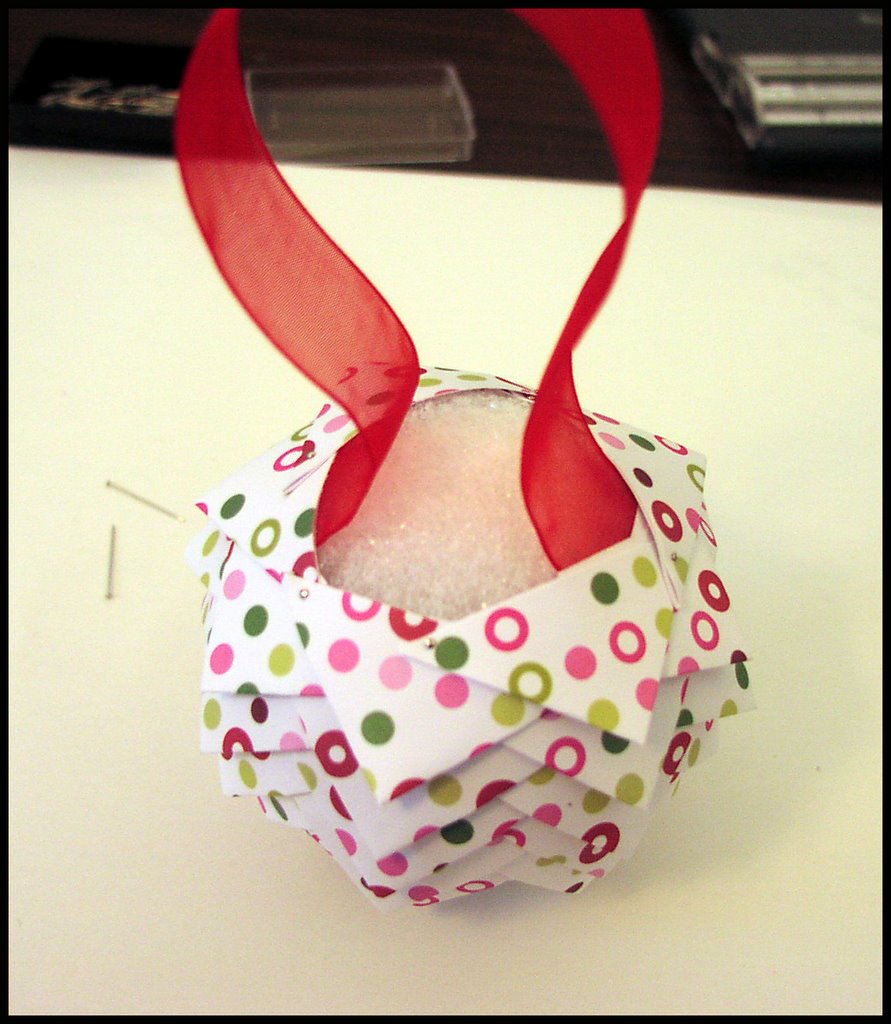

STEP 3
Pin points down on center of ball. Put all points together. Folds should be on the underside where they cannot be seen.


STEP 4
Pin down the other corner points on this first row, so that all three points of each triangle are pinned in on the first row. You will ONLY do this for the first row.
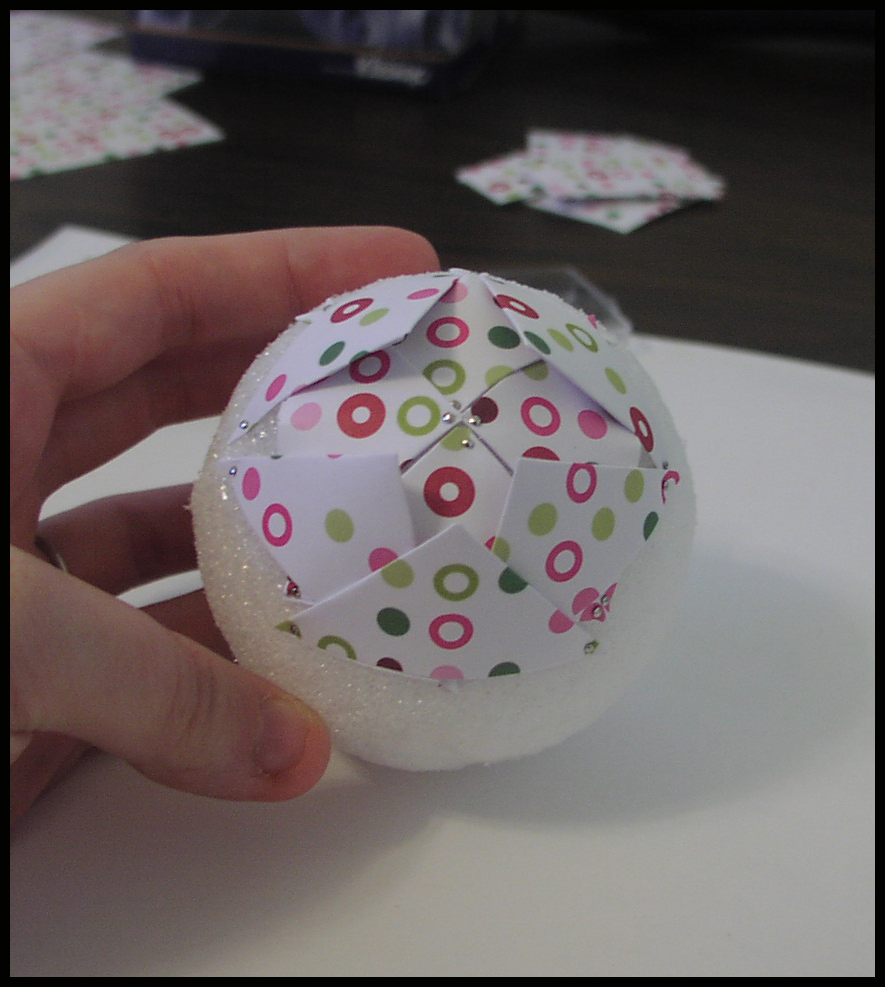


STEP 5
Begin row 2 by pinning down the two ends (not the main point) You center the main point on one of the lines, so that the base of the triangle is offset to the original pinned row. Then leave the point unpinned (this forms the pinecone like look) and pin down two other sides. Repeat this row over and over until you reach the halfway point (clear as mud? Maybe the pictures will help - I hope . . . )
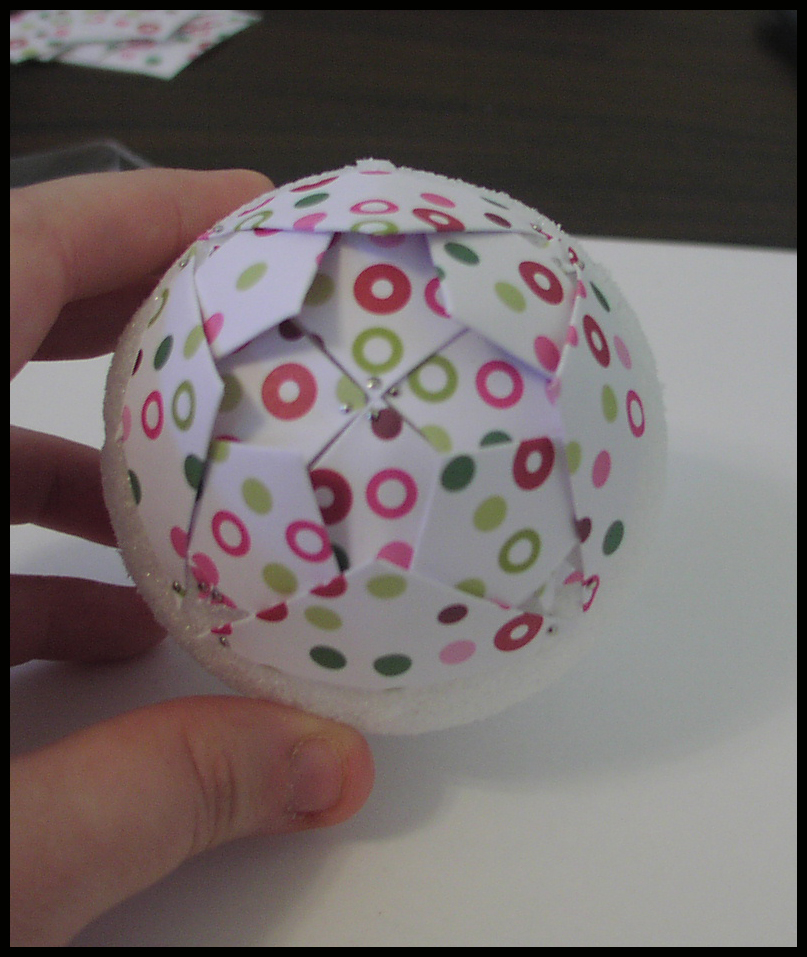

STEP 6
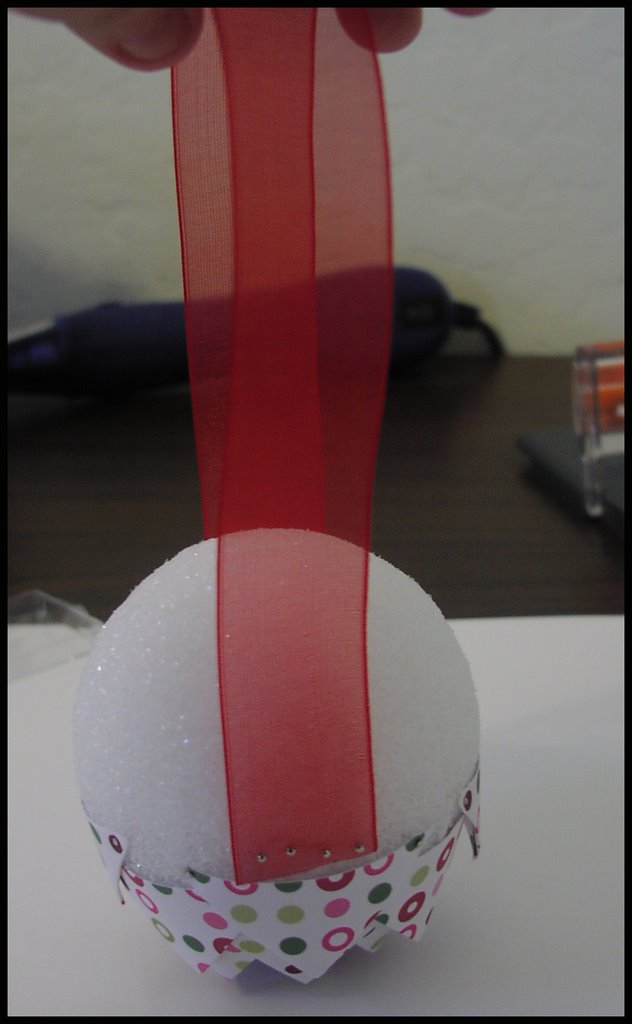
At the halfway point, pin in your ribbon. I like to stick about 4 pins on each end. If you pin the ribbon in now, leave enough at the top to form a hanger. You are going to continue to work the paper over the ribbon, which will make it secure.


STEP 7
Continue rows up until you reach the top. As you near the top, it will become increasingly harder to push the pins into the ball and through your papers -- this is where that thimble comes in handy. You will also probably run out of paper as you reach the top, or if you used 2 sheets of 12x12, will have used up 1/2 of each sheet.
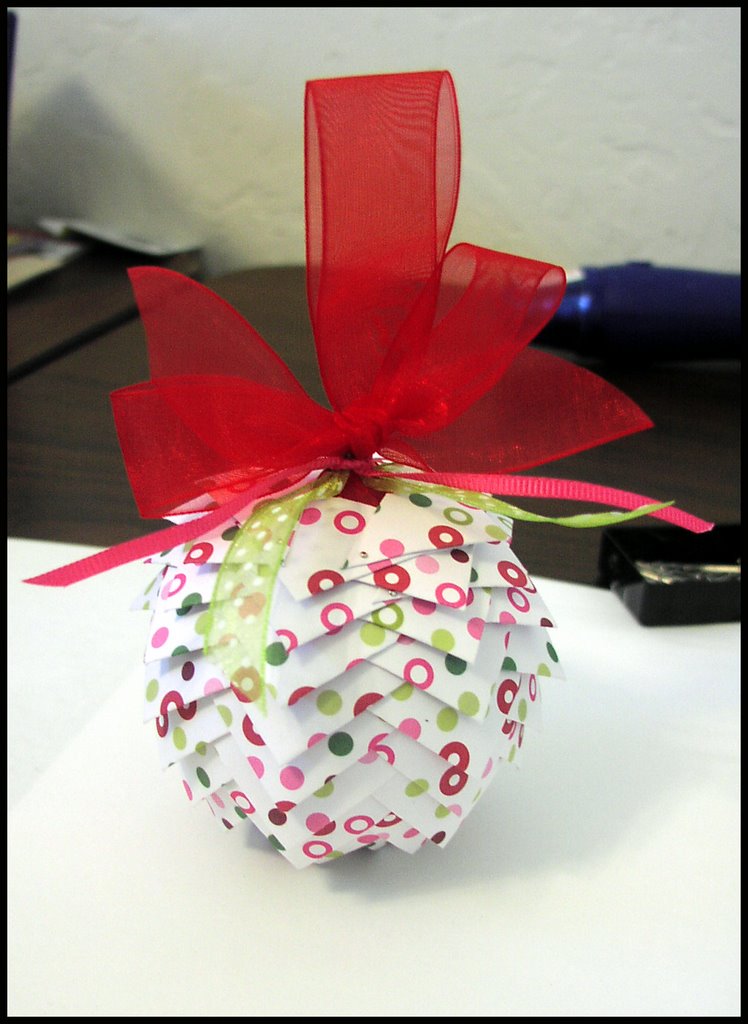

STEP 8
Tie bow at top and add any extra ribbon you would like. "Pretty it up" You are done. Hang ball on your tree and enjoy. If you have any questions, please post them in the comments section of this post and I will reply to them in that location. This will keep me from getting a bazillion emails asking the same questions. Thanks *smiles*


Thursday, November 23, 2006

Happy Thanksgiving

I am so lucky and have so much to be thankful for today. To start things off, I am so thankful for my family, my awesome husband who is so loving. For my sweet children who keep me young and keep me on my toes, and are patient with me while I learn how to be a good mommy. I am thankful for our freedom. What a lucky girl I am to be able to be who I want to be without fear. I am thankful for good friends. I have made so many awesome friends on Splitcoaststampers who literally get me through my day each day. Their knowledge and humor always keeps me set on the right path. They lift me up when I need it and kick me down when I need it. I am so thankful for that blessing in my life. I am thankful for technology. I am so excited that I can write my feelings down for the world to see. I am so thankful that when I have babies, things are quick, and painless and just easy. I can not imagine what women went through in the past. Technology is a wonderful thing. I am thankful to be alive. What a wonderful gift life is. I hope to live mine to the best of my ability. And, this list of thankfuls would not be complete without me being thankful for stamping and thankful for the support I get on this site. Seriously, I love all your comments and read each and every one. They make me feel like this is something I should keep doing.

Happy Thanksgiving from my family to yours . . .

Wednesday, November 22, 2006

What's For Dinner Wednesday - Poppy Seed Chicken

My dear friend Lisa suggested I make this on Monday when I was totally out of ideas, but since I have not made it yet this week, I think we will have it tonight. Here is my recipe for poppy seed chicken.

Tonight for dinner:
POPPY SEED CHICKEN

INGREDIENTS
5 cups chopped cooked chicken
1 (10.5 ounce) can condensed cream of chicken soup
1 cup sour cream
1 1/2 cups crushed buttery round crackers
1 teaspoon poppy seeds
1/2 cup butter, melted

DIRECTIONS:

Preheat the oven to 350 degrees F (175 degrees C).
Place the chicken into a 9x13 inch baking dish. In a medium bowl, stir together the condensed soup and sour cream. Pour over the chicken. In a separate bowl, stir together the crushed crackers, poppy seeds and melted butter. Sprinkle over the chicken and sauce. Bake for 30 minutes in the preheated oven, until the top of the casserole is browned and the sauce is bubbly. ENJOY! Tastes delish served over rice!!!

Tuesday, November 21, 2006


Yesterday I was inkspired to work on Christmas gift tags because I wrapped all my presents while I had none and I just put initials on the top of each one, and I think they will look much cuter with tags. ALSO, I am going to do my drawing from my first 100 subscribers today because we finally made it there, and in their prize pack, I will be including a bunch of gift tags. I will post the winner late tonight or tomorrow morning, depending on how bedtime goes with my kids tonight. They are so simple to make but pack quite a punch -- people will think you are so sweet and caring to have made them *wink wink* I did four designs yesterday but I have some other ideas in mind . . .

This first one is using that Stampendous Holy Family stamp again. I really love that stamp. I also love it mostest with creamy caramel. It seriously just sets it off. I aquapainted the caramel details on their clothing. The ribbon on top is cream grosgrain from SU! I also used my corner punch from SU! to make these adorable edges. Okay, I have a little confession, don't rat me out to everyone kay . . . the tag shape idea came from these awesome Basic Grey chipboard tags that I have. But, instead of using the one tag up making one gift tag, I decided to trace the pattern and then decorate the new piece. This was a cool plan because each of the tags is the same size, and I still have the chipboard to use as I wish on a later project.

This one is my DH's favorite. I stamped and embossed the poinsettia in gold on cranberry crisp cardstock. The poinsettia comes from SU's "Happiest of Holiday's" set which I got for free because I thought I might use it and used my SU hostess benefits on it. I then layered the cut out image on the white cardstock tag and added the cranberry crisp background layer, ribbon, and a little circle punch out at the top. All in all, pretty cute, but not my favorite one . . .

The next one was a quick one. The stamp came from Michael's $1 stamps. I was lucky to find it. I really love how simple it was to just stamp it and color it in. I used my aquapainter and the lid of the ink pad. After it dried a bit, I used my glaze pen to add a little faux embossed look. I colored all the trees in and it really did add something to the overall look of the tag. I think this one turned out well and was so easy I might make some more of them.

Finally, my favorite one. This one uses another stamp I found in the Michael's $1 bin, and then I also stamped a bit using the snowflake stamp from SU's "Cold Play." Can I just tell you that I seriously love that little snowflake in that set. It is just the perfect size to use as a filler when you have some odd space left when stamping snowflakes. I stamped in blue, using a spectrum pad. Then I stamped in versamark and embossed in silver. When the embossing had cooled and the ink had dried, I used my glaze pen to make the blue snowflakes look embossed too. The overall results just rocked! I love this one. It is so pretty in real life. The ribbon was some bright blue fat organdy that my DH bought for me a couple years ago for Christmas which totally matched the brilliant blue ink perfectly!!!

So that is what I was up to yesterday . . . we will see what today brings for me . . .

Monday, November 20, 2006

Starlight, Star bright, first star I see . . . tonight . . . well, almost . . . .

So I was going through all the pictures on my desktop and I realized that I did not post the ones for this starbook I made. Oops. This was for Super Saturday and I think turned out really cute using the SU designer series papers.

I learned how to do this when I was in El Paso, from Tracy Tripp. She has some cool ideas -- obviously!!!

If you are interested in a tutorial on how to do these, please post a comment and let me know. I have two tutorials that I am working on already, and three's the charm right . . .

The ornaments are from that bucket set and wouldn't you know it, I cannot remember the name of it right now. *annoying* They are colored with a blender pen and watercolor pencils and then crystal effects was placed on it and dried so it kind of bubbles up and has a 3D effect.

You could put pictures on the inside of this and also some journaling and it would look just snazzy open or closed on a Christmas tree. Speaking of which . . . is it really thanksgiving already in just a couple of days? I have so much shopping and cooking to do . . . YIKES!!! I shall try to get some cute gift tags I made uploaded before thanksgiving, and there will be no posting from me on Thursday!


Sunday, November 19, 2006

Peeking In

I spent all day yesterday Christmas shopping and today has been a busy day of recovering from the week -- cleaning, cooking, picking up, and laundry -- all my favorites -- NOT!

Friday, November 17, 2006

Pretty Paper Pinecone Christmas Balls


These were probably the biggest hit at Super Saturday. I got one of these in the mail from an awesome stamper and friend last year in our swaps, and I love to make them because they are so simple, but so neat looking. These two (pictured above) were created by me, to show at Super Saturday. The girls liked them so much, I have been asked to teach a class on how to make them, and I need to create detailed instructions on a handout in order to make it easier. SO, when I get that complete, I will post them to my blog as well, so that you too, may try these ornaments. Then class will be held the second week in December. I am really excited about it.

Thursday, November 16, 2006

Etched and Embossed Candle Holders

I found these great little glass candle holders at Walmart for less than $1 each, but they were so plain, so I used glass etching cream and etched them with small snowflakes and then embossed larger silver snowflakes on top after the etching was done and the first layer of embossing was removed. I used the emboss resist etching technique, which was really simple and produced awesome results. I wish I could get a better picture where you could see the smaller flakes more clearly, but just know that they are super pretty in real life. I placed those faker tea lights inside them and the girls at church thought they were great!!!

To complete them, I tied them with a piece of white organdy ribbon and a little bit of silver cord. The large snowflake is from "All Through the Year" stamp set by SU, and the smaller snowflake is from "Cold Play" also by SU!

You can buy etching creme at JoAnn's and Michael's and I am sure lots more places, it is not cheap, but the results I have seen so far have been awesome and I have not used very much of the small bottle of creme I bought.

I also did another candle for Super Saturday, but it was just a matter of covering it with decorative paper and adding a little gift tag. It still turned out pretty cute and I thought I would include it. (Sorry about the kind of blurry pic.)

Wednesday, November 15, 2006

What's for Dinner Wednesday - Chicken Enchilladas

So I decided that by Wednesday, I am usually tired, stressed, in pain, annoyed, or any combination of these things and the last thing I want to do is figure out what's for dinner -- so I have decided to do that before Wednesday and post it here on my blog. We will call it
"What's for Dinner Wednesday"
and you are welcome to try out my recipe and let me know what you think -- any ideas you have to make it better, etc. Think it sounds fun????

Tonight, for dinner:

CHICKEN ENCHILLADAS - Manda Style.
This recipe came from a friend in college. She was from Texas and I fell in love with these yummy enchilladas. They are easy to make and satisfying. Serve them with a side of rice.

Ingredients:
Cooking spray
precooked and shredded chicken
La Victoria Enchillada sauce (or sauce that you prefer)
Medium chedder cheese, shredded
2 cans Pinto Beans
Flour tortillas (one package - or more, depending on how many you want to make)

DIRECTIONS: Gently spray pan with PAM cooking spray, or the like. Pour a strip of enchillada sauce in a 9 x 12 baking pan. Swish it around to cover bottom of pan. Fill tortillas with beans, chicken, cheese and a small bit of sauce. Roll up and tuck in ends and place in pan so that they do not come apart, open side down often works best. When pan is full, pour remaining enchillada sauce over rolled tortillas and cover with cheese. Bake at 400 degrees until bubbly and cheese on top is melted and browning. ENJOY! Let me know how they turn out if you get to cook these . . .

and now, some stamping:


When I first made this I had high hopes of filling it with matching Christmas cards, however, I got busy and never have yet made the matching cards. The box itself would make a perfect gift for a close friend filled with christmas cards, so I think I will complete them sometime in the near future. I used the SU Designer Series Paper to make the top of the box, and used cranberry crisp cardstock for the bottom (because it is a little sturdier than the paper. The lid and the box bottom are both made by using an 8.5 x 11 sheet of cardstock, and scoring at 1.75 on all of the edges. Then you fold and cut to make the box. When you do the bottom, to make it fit better inside the top (snug, but not too snug), you trim off 1/16th of an inch on two of the sides BEFORE you score it. It makes if fit great!!! I then made a "belly band" out of twill tape. I can never find a use for this stuff, but yet somehow, it just worked perfectly for this project. I used a piece of hodgepodge hardware and some ribbons to set off the sentiment on the oval punched tag, and there you have it, a simple cardbox with belly band.

Now I just need to decide who to give this to, and complete the matching cards . . .

Only 12 more subscribers needed until we can have our drawing from the first one hundred of you -- so if you have not subscribed yet . . . do so and make sure you are always up to date on what I am up to . . .

Tuesday, November 14, 2006

Alcohol Inked Popcorn Tote and Popcorn Pull-up

WE LOVE POPCORN IN MY FAMILY! My kids just love to have it for a snack, and I personally love to take kettle corn by Orville Redenbacher (nice salty and sweet combination) and sprinkle it with dill pickle popcorn salt. YUM! So, I was browsing in my Dollar Tree store, and I came across these little white cardboard totes. I think there were 12 in a packet for only $1. Perfect little alterable item. I decided to play with my Adirondak alcohol inks with it. It worked out great. This was just one color of the alcohol inks, mixed with the blending solution and then left to dry. I had to wait for one side to dry before doing the other one (ask me how I learned that?). After it was all dry, I stamped a poinsettia from SU "Happiest of Holidays" in versamark ink and then embossed it with gold embossing powder. I added brads to the handle for interest and a little olive ribbon, burgandy ribbon (organdy) and gold cord to make it all pretty. Then I put some popcorn in a plastic bag and tied it up with cord and put it inside the tote. I think it is cute and it is a cheap and easy little gift for a school class, or just a friend who drops in sometime over the holidays.

The second project I wanted to show was a simple one I did really fast before heading to Super Saturday. It is a popcorn pull up holder and holds a package of microwave popcorn. Basically, when you pull the ribbon, it pops out the package of popcorn. This always gets "WOW's" from people who have never seen it before and is so simple to do. You simply wrap a piece of cardstock around the popcorn. Affix the ribbon at one end with a brad and wrap around the popcorn so it comes out at the same end as the brad end. Then tie a not in the ribbon and decorate as you wish. This is such a cheap and cute project. I had a lot of fun making it. I used the snowflake from a retired SU set, "Shapes and Shadows" and stamped it in vintage violet (one of the new SU "In -Color" shades) and almost amythest (which coordinates amazingly well with vintage violet). I used my new SU oval punch to punch out a tag and stamped "Joy" on it from SU "Small Script" Tied all together using some stitched vintage violet ribbon and silver cord.

Monday, November 13, 2006

End of Stampers Block - SC 97

BLINK BLINK (my eyes need tooth picks I am so tired)

Okay, so it has been forever since I have stamped something, so I decided to visit last weeks sketch challenge on splitcoast and I was surprised with the results. I really truly do not normally use rich regals at all and the embossing in two colors was all new to me too. I had fun though. What do you think of the results? Should I send it out to someone???

Oh, and lucky you guys, two posts in one day . . . looks like I am back and bloggin'!!! I am working on trying to create and get the size right on a header for my blog . . . so look for that soon . . . and for tomorrow morning -- some more Super Saturday stuff . . .

Have a loverly evening. I am just dead tired and headed off to bed. Goodnight!

Christmas Accordian Memory Book

I got this idea from a cool album that I got from texasjodylynn. I decided to create my own similar item, using a winter/christmas theme, and then leave the pages inside blank to add christmas photos and journaling.

I used fun winter paper as the background and paired it with some almost amythest SU cardstock. The image is from SU "It's Snow Time" and is watercolored using a blender pen and the lid of the ink pad. I think I only watercolored using going grey and then only orange for the noses. I really like the soft look it has and since the background paper had grey dots - I thought it would work. In the sideview photo, you can see how a paper accordian was created. Off of each of those on the inside is a page in the book. I stamped "Be Merry" on the bottom of the front cover in going grey using the "Warm Words" set. I think it finished it off really well. All in all, I was pleased with the result of this and got lots of positive feedback on it.

Sunday, November 12, 2006

Christmas Tote

Okay, sorry I kept you guys in suspense -- or just kept neglecting my blog. Anyway, I am going to start posting the things I made for my Super Saturday display.

This first item is a simple tote made by using the same technique as you would to make a 2,4,6,8 box and then adding a ribbon handle. I used decorative paper to cover some of the sides to make it more exciting and stamped "Holiday Greetings" on the side. This would be the perfect little gift to give to a co-worker or friend. I filled it with cinnamon jolly ranchers candy.

To create the 2,4,6,8 box bottom, take a normal 8.5 x 11 paper, score at 2,4,6, and 8 inches (width wise -- the 8 should leave you a 0.5 strip at the edge). Then score at 2 inches from the bottom lengthwise. Then you cut up to the 2 inch score line on the lengthwise side to create bottom flaps. The little 0.5 inch edge piece is used to fold it into a box shape. Then you close up the tabs to for a bottom and tada -- an easy box. Okay, so those are confusing directions if you have never seen this done before. I am sorry. If you are interested and confused, zip me a comment or email and I will help you out as best as I can.

Oh, and one more thing, we went over 10000 views to my blog page! Thanks so much for your support! I appreciate it!!!

Friday, November 10, 2006

Congratulations . . .

to Karen (gamblemom) for posting comment number 100 on post 100. She will get 100 embellishments in the mail! YAY! She has a really cool blog too -- so if you have not seen that -- check it out.

and now . . .

I am off to stamp something . . .

Monday, November 06, 2006

UPDATE

So things did not progress in the organized fashion they were supposed to. They did manage to move the wall and the drywallers came, however, it is Monday now and the carpet guys and the shelf guys were supposed to both come today. Well, the shelf guy came and it is now all done that much, but the carpet and baseboards need to be put in and apparently the carpet guy cannot come today. *is seriously annoyed* The puppy is arriving tomorrow, so he will be scared already after his trip on the plane and then with the two kids in his face, more scared and then when they are hammering and such because they are putting in the carpet, he will be terrified. Have I mentioned recently that WE HATE OUR BUILDER? We do. I would never use K Hovnanian as our builder ever again. BUYER BEWARE. We have had so many issues with them. *is frustrated*

Anyway, I wanted to update you all, so you knew where we were at with things. My office/stamp room is still in a state of disarray. I cannot access anything. It is all dust covered because they did not cover it with a plastic sheet *more annoyingness* I have not uploaded to my SCS gallery since 10/17 and I just miss stamping like so bad. I wish there was someone for me to yell at, but of course our warranty guy is not answering his phone. *sigh* I will be back soon . . . hopefully in time for VSN on splitcoaststampers.

In good news -- Hobby Lobby opened near me this weekend. The first one in Arizona. Anyway, since everything was half off, I decided to get some ribbon. *is worried I will soon be like texasjodylynn* Not that that would be a bad thing, the girl loves her ribbon and is a wonderful stamper and friend -- but now I can see why she has so much ribbon. I had fun!

Wednesday, November 01, 2006

All Saints Day

For the next three days my stamp room/aka office, is is a mess because the builders accidentally screwed up and put the wall in the wrong place, so they are going to knock out the wall and rebuild it in the right spot. I had to move all my stamp stuff to one side of the room, which is sad because now I cannot use my stamp room. They should be done in three days though, so I will be able to stamp next week. I will post the stuff from Super Saturday soon too -- maybe this weekend, after they finish because I went to look and there is no way I can access anything of mine in that room. It is all plastic covered and scary. I really want to photograph the stuff for you and I promise I am not just teasing you all -- it has just been seriously hectic. I am sure you all know how it goes . . . be back soon!